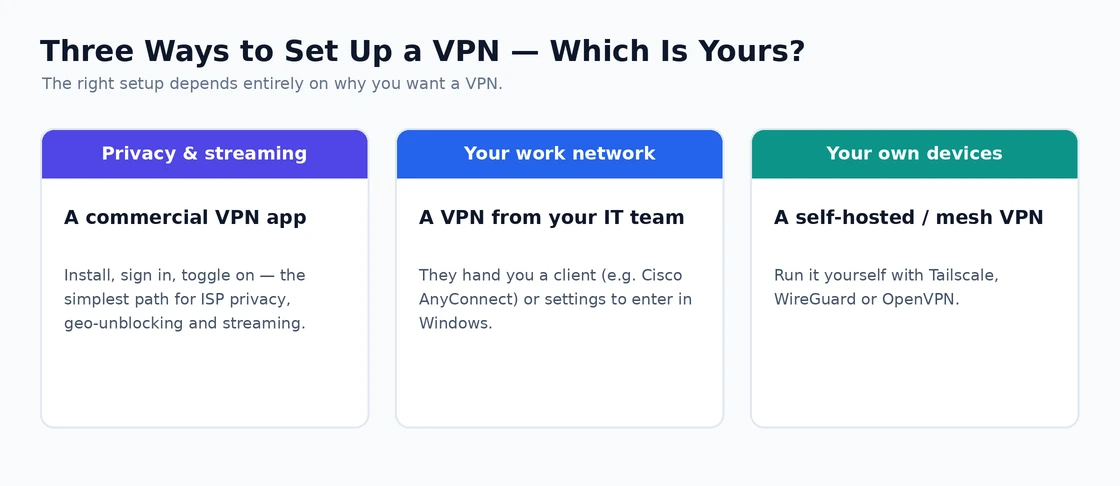
The honest first question for setting up a VPN on Windows is which kind of VPN setup you actually need, because the three common scenarios are genuinely different procedures with different right approaches. The commercial VPN app setup (for users wanting privacy, geographic content access, or general network protection) is dramatically simpler than the others. The work-network VPN configuration (for remote employees connecting to corporate networks) requires specific information from your IT department that no general guide can provide. The self-hosted VPN setup (for users wanting access to their own remote infrastructure) is technical work that does not match the assumptions of most VPN articles. Lumping these together produces guides that fit none of the scenarios well.
Disclosure: this article contains affiliate links. If you sign up through one, we may earn a commission at no extra cost to you.
This matters because users come to “VPN setup on Windows” with very different needs and most guides assume a single scenario without identifying which. Users wanting privacy from their ISP get instructions for corporate VPN configuration that does not help them. Remote employees following commercial VPN guides cannot actually connect to their work network. Users wanting personal infrastructure access face guides that send them to commercial services they do not need.
This guide is structured around the three scenarios because the procedures genuinely differ. For broader context on the Windows networking and VPN software stack, our guide to the best software and apps covers the adjacent categories.
Scenario 1: Commercial VPN App Setup (Most Common Case)
If your VPN motivation is privacy from your ISP, accessing geographic content, protection on public wifi, or general network security, the right setup is a commercial VPN app. This is the simplest scenario and the one most VPN articles actually describe, even when they do not specifically say so.
The setup process is genuinely simple. Choose a VPN service appropriate for your motivation (covered in our Windows VPN comparison), sign up for an account through their website, download the Windows app from their official site, install with administrator privileges, sign in to your account, and connect. The whole process typically takes 10-15 minutes including account creation.
The specific recommendations vary by motivation. For streaming and geographic content access, ExpressVPN (expressvpn.com) or NordVPN are the credible defaults — both have Windows apps that handle the installation and connection workflow smoothly. For privacy-focused use, Mullvad VPN (mullvad.net) is the strong choice with the simplest pricing and strongest privacy commitments. For users wanting free options for occasional public wifi use, ProtonVPN’s free tier and Cloudflare WARP both work without requiring payment.
After installation, the realistic settings to configure are minimal. The default server selection (usually “fastest server” or similar) works adequately for most cases. The automatic connect on Windows startup option enables ongoing protection without manual action each session. The kill switch feature (which blocks internet if the VPN disconnects unexpectedly) prevents accidental traffic leaks when the VPN connection drops.
For users specifically wanting to use a VPN for streaming services in other countries, the server selection becomes more important. Connect to a server in the country whose content you want, verify your IP address shows that country (websites like whatismyip.com confirm this), and access the streaming service. If the streaming service blocks the VPN (which happens periodically as services try to enforce regional licensing), trying different servers in the same country usually finds one that works.
Troubleshooting commercial VPN connection issues typically follows standard patterns. Restart the VPN app first — this resolves most temporary issues. If the app cannot connect to any server, restart your computer to clear network state. If specific servers fail but others work, the issue is likely with those servers rather than your setup. If all servers fail consistently, the issue is more likely with your internet connection or local firewall settings than with the VPN itself.
For most users in this scenario, the commercial VPN app handles everything. The other scenarios below apply only if your VPN need is specifically corporate or self-hosted.
Scenario 2: Work-Network VPN Configuration
If your VPN motivation is connecting to your employer’s network for remote work access, the setup is fundamentally different and depends entirely on information your IT department provides. No general guide can specify the right configuration because the parameters are organisation-specific.
The realistic situation: your IT department will provide either a specific VPN client application to install, instructions for configuring Windows’ built-in VPN client with specific server and authentication settings, or both. The information you need from IT includes the VPN server address (might be a hostname like vpn.company.com or an IP address), the VPN protocol the network uses (typically IKEv2, L2TP/IPSec, or SSTP for Windows built-in client, or vendor-specific for dedicated clients), authentication method (username/password, certificate-based, or two-factor authentication), and any specific application download links if your organisation uses a dedicated client.
For organisations using dedicated VPN clients (Cisco AnyConnect, Palo Alto GlobalProtect, FortiClient, OpenVPN Connect, Pulse Secure, others), the setup follows the application’s installation process with the configuration profile your IT department provides. The configuration profile is usually a file with extension like .pcf, .opvn, or .xml that you import into the client. The client handles the rest of the connection details based on what is in the profile.
For organisations using Windows’ built-in VPN client with manual configuration, the setup goes through Settings → Network & Internet → VPN → Add a VPN connection. The form asks for connection name (anything memorable), VPN provider (typically “Windows built-in”), server name or address (from IT), VPN type (the protocol), and authentication details. Your IT department’s documentation should specify each field’s exact value.
Common work VPN setup issues include certificate problems (often resolved by importing a certificate your IT department provides), authentication failures (often resolved by ensuring your work account is correctly typed including any domain prefix), and routing problems where the VPN connects but you cannot access specific work resources. For all of these, contacting your IT department’s help desk is the appropriate response rather than attempting to diagnose independently — work network configurations have specific requirements that troubleshooting documentation cannot anticipate.
For users who reached this guide thinking commercial VPN setup would work for accessing work resources, the honest framing is that commercial VPNs do not connect you to work networks. A consumer VPN service like ExpressVPN encrypts your general internet traffic but cannot route your traffic to your employer’s internal resources. The work VPN provided by your IT department is what enables this access.
Scenario 3: Self-Hosted and Personal Infrastructure VPN
If your VPN motivation is accessing your own remote infrastructure — a home server, a personal NAS, a remote development environment, services you self-host — neither commercial VPNs nor work VPNs apply. The setup is more technical and involves either configuring your own VPN server or using modern services designed for personal networks.
Tailscale (tailscale.com; free for personal use, paid tiers for teams and additional features) is the modern friendly option for personal infrastructure access. The product abstracts most of the technical complexity of traditional VPN setup. You install Tailscale on each device you want connected, log in with the same account on each, and the devices can reach each other through a private network that Tailscale manages. The free tier handles realistic personal use including remote access to home servers, personal development environments, and small workgroup networks.
The case for Tailscale specifically is the friction reduction. Traditional VPN setup involves opening ports on routers, configuring NAT traversal, managing certificates, and various other technical details that Tailscale handles automatically. For users with personal infrastructure access needs but without VPN expertise, Tailscale produces working access without requiring the underlying expertise.
For users specifically wanting to run their own VPN server with traditional self-hosted infrastructure, the options include OpenVPN (mature, well-documented, runs on various hardware), WireGuard (newer, simpler, more performant), and Tailscale’s underlying technology (Headscale provides self-hosted Tailscale-compatible servers). Each has trade-offs in setup complexity, performance, and feature depth.
The realistic setup for OpenVPN involves installing on a server (Linux server typically, or specific router firmware that supports it), generating certificates for clients, configuring the server settings, distributing client configuration files, and installing OpenVPN clients on devices. The process takes hours of work for someone without prior VPN administration experience and assumes Linux familiarity.
WireGuard is simpler to set up but has similar requirements — a server to run it on, key generation, configuration files for clients, distribution of configurations. The technical complexity is lower than OpenVPN but still substantial compared to commercial VPN services.
For most users wanting personal infrastructure access, Tailscale is the right answer. The complexity of OpenVPN or WireGuard self-hosting is appropriate only for users who specifically value self-hosting (privacy from third-party services, learning, or specific feature requirements) rather than as a default approach. Our network monitoring software comparison covers the related category for users administering personal network infrastructure.
Windows Built-In VPN Client Configuration in Detail
For users following work network setup or specific configurations that use the Windows built-in client, the configuration details matter.
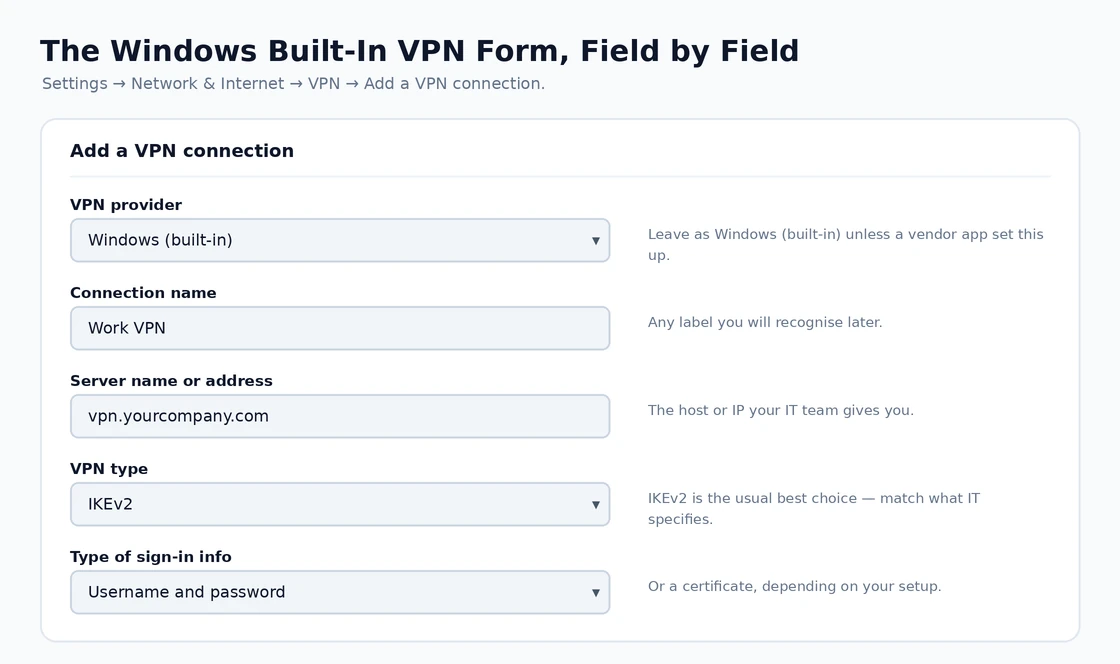
Settings → Network & Internet → VPN → Add a VPN connection opens the configuration form. The fields require specific information from your IT department or VPN provider.
“VPN provider” should typically be “Windows (built-in)” unless your organisation uses a specific provider that appears in the dropdown. “Connection name” is purely for your reference — anything memorable works.
“Server name or address” is the hostname or IP address of the VPN server. This is provided by your IT department; for personal setups, this is the public address of your VPN server.
“VPN type” specifies the protocol. IKEv2 is generally preferred for new configurations because of better performance and security than older protocols. L2TP/IPSec works widely but has less efficient encryption. SSTP works through firewalls that block IKEv2 but is Microsoft-specific. PPTP should be avoided for security reasons unless legacy compatibility absolutely requires it.
“Type of sign-in info” specifies authentication. Username and password is most common for standard setups. Smart card requires a physical authentication device. One-time password uses time-based codes from an authenticator app or hardware token. Certificate uses a digital certificate installed on your computer.
After saving the configuration, the VPN appears in your network connections. Clicking it produces the connect button. The first connection may prompt for authentication details that were not collected during setup; subsequent connections may remember credentials based on your “Remember my sign-in info” choices.
Troubleshooting built-in client issues: if the connection fails to establish, the error messages provided are often cryptic but searching the specific error code produces useful information. Most failures relate to incorrect server addresses, wrong protocol selection, authentication problems, or firewall blocking. Each has standard troubleshooting steps that documentation for your specific VPN setup should cover. Our encryption software comparison covers the related category for users wanting broader cryptographic protection alongside VPN use.
The Security Considerations That Apply Across Scenarios
Regardless of which VPN setup scenario applies, several security considerations matter.
VPN encryption protects your traffic from network eavesdropping but does not make you anonymous. Websites you visit still see whatever identifying information your browser provides (cookies, login credentials, browser fingerprint). The VPN shifts trust from your network operator (ISP or current wifi network) to the VPN service or your work network. For users wanting actual anonymity, more than VPN is needed.
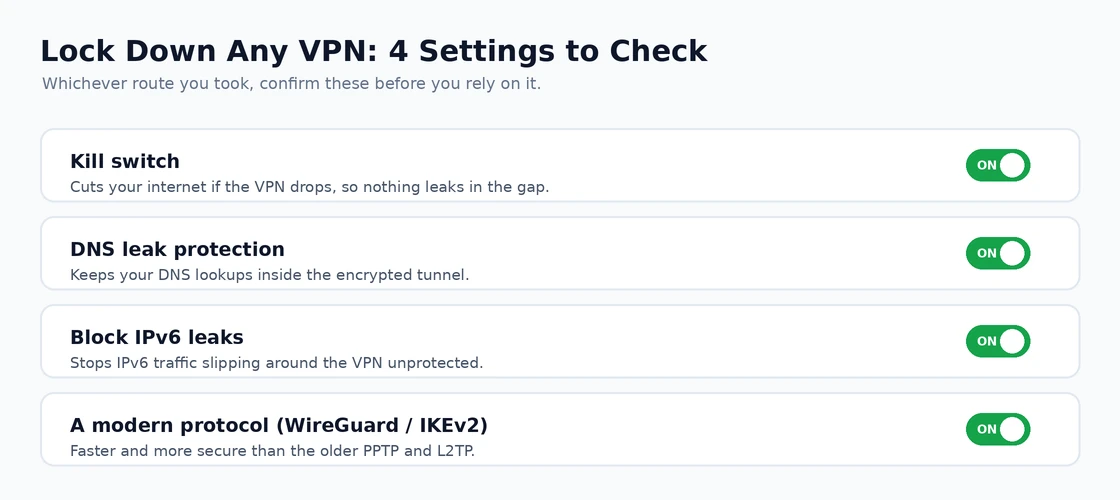
The kill switch feature is genuinely important for users with privacy-related VPN motivation. Without a kill switch, brief VPN disconnections leak your real network connection to wherever you were browsing. Commercial VPN apps include kill switches that should be enabled. Manual VPN configurations through Windows built-in client do not include this feature directly, which is one reason commercial apps often serve privacy users better than built-in configuration.
DNS leaks are a related concern. By default, DNS queries (which translate domain names to IP addresses) may bypass the VPN tunnel and go directly to your ISP’s DNS servers. Modern commercial VPN apps configure DNS routing through the VPN automatically; manual configurations may need explicit DNS server configuration to prevent leaks. Testing for DNS leaks at dnsleaktest.com or similar services verifies your setup works correctly.
IPv6 traffic can also leak around VPN tunnels if not properly configured. Many VPN configurations only handle IPv4 traffic; if your network supports IPv6 and the VPN does not, IPv6 traffic bypasses the VPN. Commercial VPN apps typically handle this automatically; manual configurations may require disabling IPv6 on the network connection.
For users specifically requiring strong protection, the realistic recommendation is using commercial VPN apps from reputable providers with proper kill switches, DNS leak protection, and IPv6 handling rather than building manual configurations that may have these gaps. Our VPN for Mac comparison covers the cross-platform considerations that often matter when users need VPN protection across multiple devices.
Common Setup Problems and Their Fixes
Specific common problems across all three setup scenarios deserve mention.
“VPN connects but I cannot reach internet” usually indicates DNS routing problems. The VPN tunnel is established but DNS queries fail. Fix: configure DNS servers manually on the VPN connection (1.1.1.1 and 1.0.0.1 for Cloudflare, or 8.8.8.8 and 8.8.4.4 for Google) and try again.
“VPN connects but specific applications cannot reach the network” usually indicates application-specific firewall rules or VPN split tunneling. Some applications are configured to bypass VPN routing; the application configuration or VPN split-tunnel settings determine which applications use VPN versus direct network. For full-tunnel protection, ensure split tunneling is disabled.
“VPN was working but stopped after Windows update” usually indicates that the update changed network configuration or affected VPN client compatibility. Check for VPN client updates first, then verify Windows network settings have not changed, then reinstall the VPN client if needed.
“VPN works on wifi but not cellular tethering” or vice versa usually indicates network-specific MTU (Maximum Transmission Unit) issues. Some networks require lower MTU settings than the VPN default. Reducing MTU in the VPN configuration (1400 instead of default 1500 is a common starting point) often resolves these issues.
“VPN connection drops repeatedly” usually indicates network reliability issues rather than VPN issues. Check your underlying internet connection stability separately. If the underlying connection is stable but the VPN keeps dropping, try different VPN servers, different VPN protocols, or different VPN providers — the issue may be specific to one configuration that another would resolve.
The Practical Recommendation
For most users in 2026 setting up a VPN on Windows, the answer follows from your specific scenario. Commercial VPN for privacy, content access, or general protection: install your chosen provider’s Windows app (ExpressVPN, NordVPN, Mullvad, ProtonVPN depending on motivation), enable the kill switch, and connect — this is the simple case and the one most users actually need. Work network access for remote employment: contact your IT department for specific configuration parameters because no general guide can provide them; the setup uses either dedicated VPN clients or Windows built-in client with organisation-specific settings. Personal infrastructure access for self-hosted services: Tailscale for friendly modern setup, OpenVPN or WireGuard for traditional self-hosted approach if you have technical expertise. The wrong move is following commercial VPN setup guides when you need work VPN configuration, or following work VPN guides when you need commercial privacy VPN — these are different scenarios with different right answers. Identify your specific scenario honestly, follow the procedure appropriate for that scenario, address security considerations (kill switch, DNS leaks, IPv6) that apply across all scenarios, and the VPN setup produces working protection rather than confusion about why your specific use case is not being served.