When Word’s spell check stops marking mistakes, most people go straight to File → Options → Proofing — and find everything looks correct. The setting that’s actually broken is usually somewhere else entirely. We go deeper on the whole subject in our Complete Guide to Fixing Windows, Browser, and Software Errors.
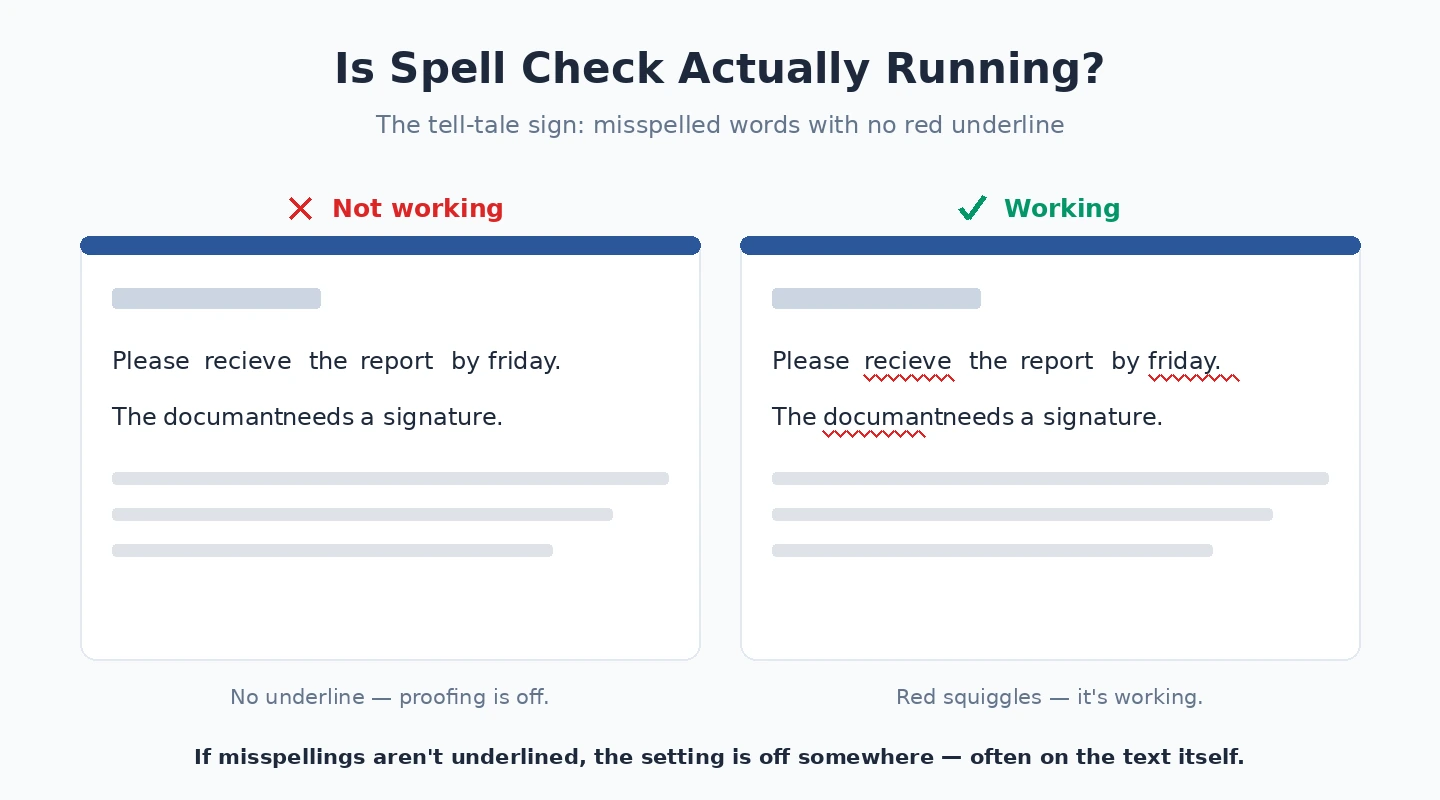
The most overlooked cause: Word’s “Do not check spelling or grammar” option can be enabled per-document without any visible warning. If someone sent you the file, or it was converted from another format, this exception may already be active — and no amount of proofing changes will help while it is.
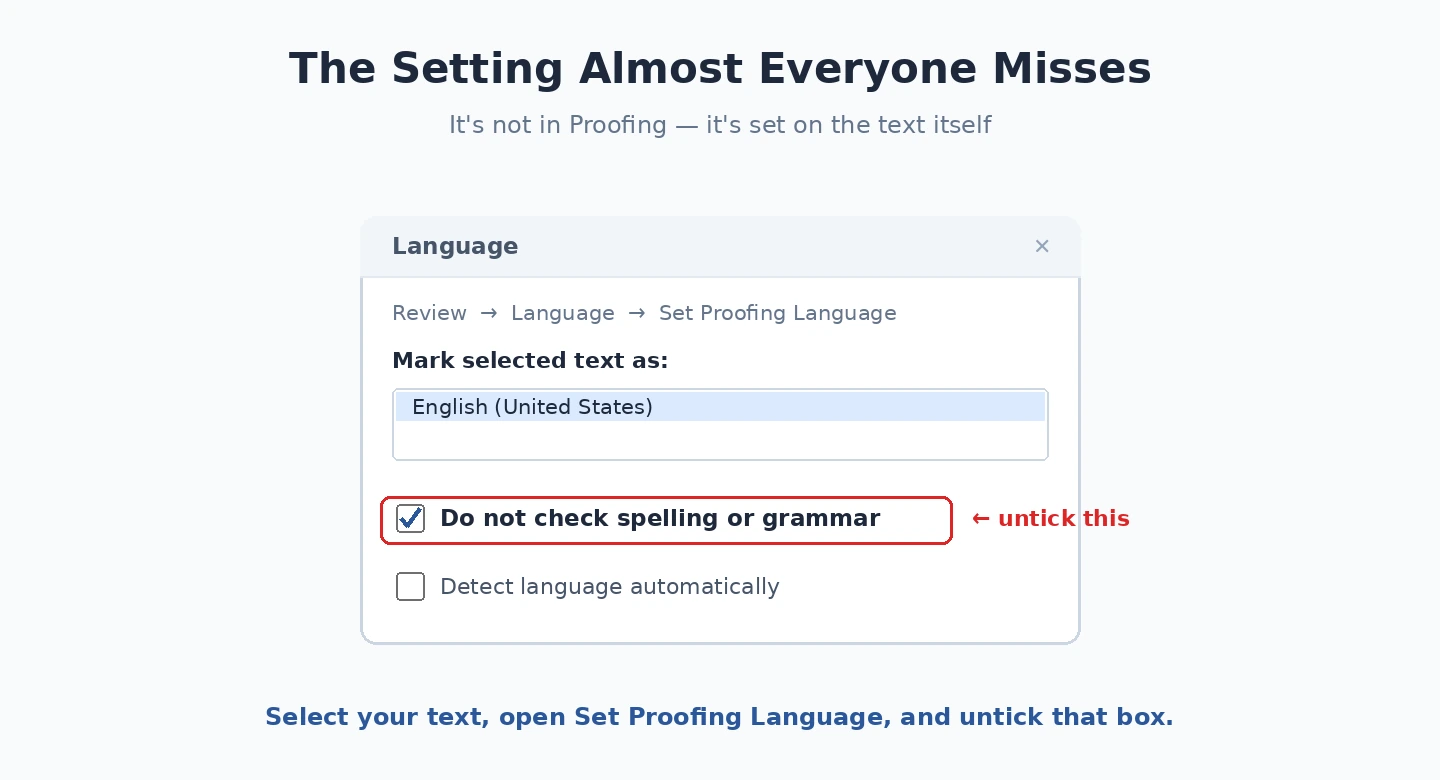
Start here with the fastest check: press Ctrl+A to select all text, go to Review → Language → Set Proofing Language, and make sure “Do not check spelling or grammar” is unchecked. This one setting resolves the problem for the majority of users who’ve spent 20 minutes adjusting the wrong options.
Fix 1: Proofing is disabled for the text
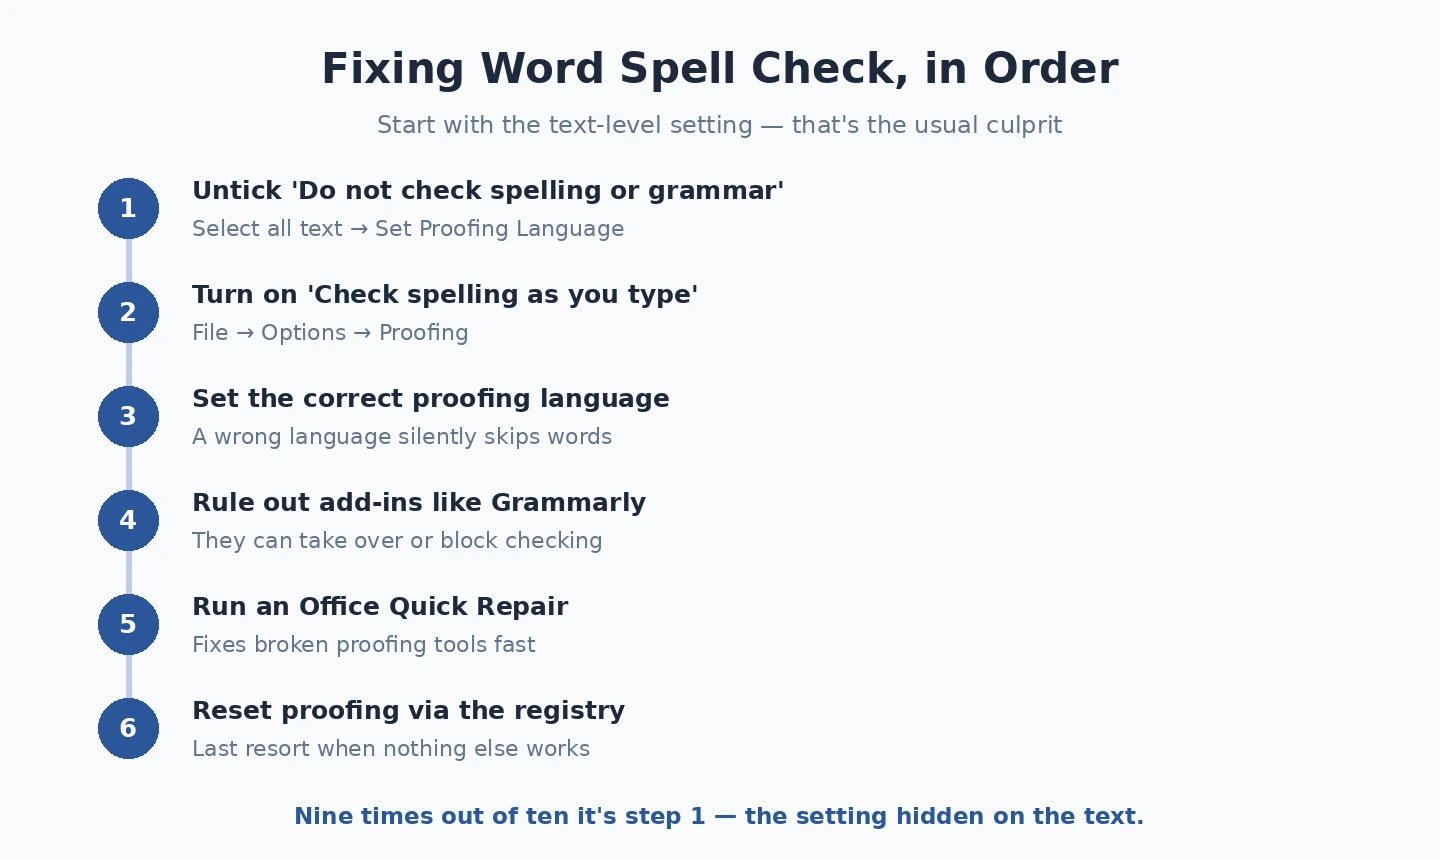
This is the most common cause of spell check not working in Word. Text can be marked as “Do not check spelling or grammar,” which disables the red underlines for that selection without disabling spell check entirely. Select all text (Ctrl+A) → Review tab → Language → “Set Proofing Language” → uncheck “Do not check spelling or grammar” → OK.
This per-selection setting persists when text is pasted from other documents or applications. If text was pasted from Outlook, PDF, or another Word file where proofing was disabled: the “Do not check” flag travels with the text. Selecting all and applying the language setting clears this flag for everything in the document.
Fix 2: Check spelling options in Word settings
File → Options → Proofing → “When correcting spelling and grammar in Word” section. Confirm:
- “Check spelling as you type” → checked
- “Mark grammar errors as you type” → checked (if you want grammar checking)
- “Hide spelling errors in this document only” → unchecked
The “Hide spelling errors in this document only” setting hides the red underlines only in the current document. If this was checked for one document you work in frequently: that document shows no errors even though spelling is being checked. Unchecking it restores the underlining for that document specifically.
Fix 3: Language mismatch
Word’s spell checker requires a proofing dictionary installed for the document’s language. If the document is set to British English but only US English proofing tools are installed: the spell checker has no dictionary to check against and silently skips checking.
Review tab → Language → “Set Proofing Language” → check which language is selected. Then: File → Options → Language → “Choose Editing Languages” → check whether your language shows “Proofing” as Installed or Not Installed. If Not Installed: click “Get proofing tools for [language]” — this opens the Microsoft 365 language pack download page. Install the proofing tools and restart Word.
Fix 4: Custom dictionary issues
Word uses a custom dictionary alongside the main dictionary for words you’ve added by right-clicking → “Add to Dictionary.” If the custom dictionary file becomes corrupt: spell check fails to load correctly and may stop underlining errors. File → Options → Proofing → Custom Dictionaries → check whether a valid custom dictionary is listed. If the dictionary shows an error or the file path is invalid: remove it from the list (the default CUSTOM.DIC is recreated automatically) → restart Word → spell check should work normally.
Fix 5: Word add-ins conflict
Add-ins (including Grammarly, third-party spell checkers, and document automation tools) sometimes conflict with Word’s built-in proofing. If Grammarly is installed: it may disable Word’s native spell check to avoid duplicate underlining. Open Word in Safe Mode (hold Ctrl while clicking the Word shortcut) — this disables all add-ins. If spell check works in Safe Mode: an add-in is the cause. File → Options → Add-ins → Manage → COM Add-ins → Go → disable add-ins one at a time to identify the conflict.
Fix 6: Office Quick Repair
Corrupted proofing tools — including the spell checking engine and dictionaries — sometimes result from failed Office updates or disk errors. Settings → Apps → Microsoft 365 (or Microsoft Office) → Modify → Quick Repair → Repair. After completing (about 5 minutes, no internet needed): restart Word and test spell check. Quick Repair reinstalls all Office components including the proofing engine without reinstalling the entire application.
Fix 7: Registry reset for proofing options
As a last resort: Word’s proofing settings are stored in the registry. Deleting the Word key causes Word to recreate it with defaults, including correct proofing settings. Close Word → Win+R → regedit → navigate to HKEY_CURRENT_USERSoftwareMicrosoftOffice[version]Word → right-click “Options” subkey → Delete → restart Word. Version number: 16.0 for Office 2016/2019/2021/365; 15.0 for Office 2013.
Our guide on Office installation issues covers the Quick Repair process that also fixes spell check infrastructure problems. For the language pack installation that affects Word spell checking in non-English languages, our language settings guide covers the Windows and Office language configuration. Microsoft’s Word proofing documentation covers the advanced spell check settings including custom dictionaries, autocorrect, and the Proofing Exceptions list that can hide errors for specific parts of a document.
Spell check works in new documents but not existing ones
When spell check functions correctly in a fresh document but not in a specific existing file: the problem is document-specific rather than a Word configuration issue. The “Do not check spelling or grammar” setting from Fix 1 is almost certainly the cause — it’s stored with the document and travels wherever the file goes. Open the problematic document → Ctrl+A → Review → Language → Set Proofing Language → uncheck “Do not check spelling” → save the document. Future opens of this file will check spelling correctly.
Grammarly integration specifically
Grammarly’s Word add-in is the single most common cause of Word’s built-in spell check stopping after “it was working fine.” Grammarly takes over Word’s proofing notifications when installed. The result: Word’s red underlines disappear and are replaced by Grammarly’s own suggestions. If Grammarly’s suggestions also aren’t showing: either Grammarly isn’t signed in, or it’s disabled for this document type.
If you want Word’s native spell check rather than Grammarly: File → Options → Add-ins → COM Add-ins → Go → uncheck Grammarly → OK → restart Word. Word’s built-in spell check returns immediately. If you prefer Grammarly: sign into the Grammarly add-in within Word’s Grammarly sidebar, and it provides its own (generally more comprehensive) proofing.
Spell check for specific text sections
Word allows setting different languages and proofing rules for different sections of the same document. A document with French quotations embedded in an English document might have the French sections marked as French language — which is correct behaviour. If spell check seems to miss errors in certain parts of the document: select that section → Review → Language → check which language is assigned. Reassign to the correct language if it’s wrong.
Code and technical content in Word documents
Documents with code samples, technical terminology, URLs, or product names get constant red underlines for correctly spelled technical terms that aren’t in the dictionary. Managing this without disabling spell check entirely:
- Right-click each correctly-spelled technical term → “Add to Dictionary” — adds it to the custom dictionary for future documents too
- For code blocks: select the code → Review → Language → “Do not check spelling or grammar” → applies only to the selected code block, leaving the rest of the document proofed
- For domain-specific terminology: File → Options → Proofing → Custom Dictionaries → Edit → add your technical terms manually to the custom dictionary file
AutoCorrect and spell check interaction
Word’s AutoCorrect fixes common mistakes as you type — often before the spell checker even marks them. If AutoCorrect is correcting a word and spell check then doesn’t underline it: this is working as designed. The word was corrected before proofing ran. If AutoCorrect is changing words you want to spell differently (technical terms, proper names that look like misspellings): File → Options → Proofing → AutoCorrect Options → remove specific rules or disable “Replace text as you type” for the words it incorrectly changes.
Spell check and Track Changes
When Track Changes is enabled: Word shows revisions alongside the original text. Spell check may flag deleted text (tracked as “changed” but not yet accepted) as errors. The red underlines can overlap confusingly with tracked change formatting. Review → Accept All Changes (if appropriate) → then run spell check on the clean document. Alternatively: Track Changes → Show Markup → uncheck “All Markup” to hide tracked changes temporarily while spell checking — the changes are preserved, just not shown.
| Symptom | Cause | Fix |
| No red underlines anywhere in a document | “Do not check spelling” flag set on text | Ctrl+A → Review → Language → uncheck the flag |
| Works in new docs, not specific file | Document-level “hide errors” setting | File → Options → Proofing → uncheck “Hide spelling errors in this document” |
| No proofing tools for a language | Language pack not installed | File → Options → Language → install proofing tools |
| Stopped after installing Grammarly | Grammarly replaced built-in spell check | Disable Grammarly add-in to restore native spell check |
| F7 also finds no errors | Custom dictionary corrupt or add-in conflict | Rebuild custom dictionary; run Safe Mode test |
| Spell check slow or crashes | Proofing component corrupted | Office Quick Repair |
Word spell check problems are almost always configuration rather than corruption — the “Do not check spelling” flag and the Options → Proofing settings cover the majority of cases. These are settings that get changed silently (paste from another document, add-in modification, accidental setting change) and are easy to restore once you know where to look. The Safe Mode test for add-in conflicts is the next step when the settings are correct but spell check still isn’t working.
Spell check in Word Online vs desktop Word
Word Online (the browser version) has a simpler spell checker than desktop Word. If spell check works in Word Online but not the desktop app: the issue is desktop-specific (add-ins, settings, or installation). If neither works for the same document: the document itself has the “Do not check” flag (Fix 1 resolves in both versions). Word Online’s spell check is also browser-dependent — the browser must have spell check enabled and in the correct language for Word Online’s checking to align with local language settings.
Proofing tools and Office update channel
Microsoft 365 on the Current Channel (fastest updates) receives proofing improvements monthly. Office 2019/2021 perpetual licenses receive proofing engine updates only through major service releases. If spell check quality seems to have declined (missing obvious errors that it previously caught): this may be a proofing engine regression in a recent update. File → Account → Update Options → Update Now forces the latest update, which often includes proofing corrections.
For Microsoft 365: switching between Current Channel and Monthly Enterprise Channel (more stable, delays updates by one month) is available through the Microsoft 365 admin portal. Some organisations use Semi-Annual Enterprise Channel for maximum stability — but this means spell check improvements arrive 6+ months later than on Current Channel.
One pattern that catches many users: copy-pasting from websites or PDFs often brings in non-breaking spaces, special Unicode whitespace, or other invisible formatting characters. Spell check can mis-tokenise words that contain these characters, treating “résumé” (with a non-breaking space in the middle due to PDF extraction) as two separate word fragments that don’t match anything in the dictionary. The red underline appears under an unusual boundary. The fix: paste using “Paste Special → Unformatted Text” (Ctrl+Shift+V → plain text) when pasting from external sources, which strips invisible formatting characters and allows spell check to process words correctly.
For academic users and professional writers: Word’s spell check limitations are worth knowing. It checks against a general vocabulary dictionary — technical, academic, legal, or medical terminology gets flagged even when correctly spelled. Building a domain-specific custom dictionary (File → Options → Proofing → Custom Dictionaries → Edit → add terms) improves accuracy significantly for specialised writing. The custom dictionary file (CUSTOM.DIC) can be exported and imported across computers, allowing the same vocabulary to be available in Word on multiple machines without re-adding terms individually.
The Ctrl+A → Review → Language → uncheck “Do not check spelling” sequence is worth memorising as the single most commonly needed Word spell check fix. It addresses the majority of cases where spell check seems broken in a document that was working fine before — particularly when the document was received from someone else or when text was pasted from external sources. For anything more persistent than a document-specific issue, the Safe Mode test immediately identifies whether add-ins or Word settings are the culprit, directing every subsequent step precisely.
A brief note on Word spell check vs grammar check: these are separate features that can be enabled or disabled independently. “Check spelling as you type” controls red underlines; “Mark grammar errors as you type” controls blue underlines. Some users disable grammar check (because the suggestions are often stylistic rather than errors) while keeping spell check active. If you see no underlines at all: confirm both settings, but if you only want spell check without grammar check: disabling grammar checking while keeping spell checking active is a perfectly valid configuration.
Why did Word spell check suddenly stop working?
The most common sudden cause is a language setting change — from a Windows or Office update that reset the document language, or from pasting text that had a different language assigned. When the spell check language doesn’t have a matching dictionary installed, Word silently stops marking errors rather than showing a message explaining why.
Why is spell check broken on one document but fine on others?
This almost always means the “Do not check spelling or grammar” exception is set on that specific document. Open it, press Ctrl+A, go to Review → Language → Set Proofing Language, and uncheck that option. Saving as a new file afterwards prevents the exception from persisting. If this sounds familiar, Outlook Signature Not Showing is worth a look.
Can I fix spell check without reinstalling Office?
Yes — reinstalling is almost never necessary. The fixes that work in the vast majority of cases are: correcting the proofing language, unchecking the per-document spelling exception, and running a Quick Repair from Control Panel → Programs → Microsoft Office → Change → Quick Repair. Only attempt a reinstall if all other fixes fail. Our guide on Slack Notifications Not Working covers an adjacent issue.
Why does spell check work in some languages but not others?
Each language requires its own dictionary pack. If Word is set to a language that doesn’t have proofing tools installed, it can’t check spelling and silently does nothing. Go to File → Options → Language — any language showing “Proofing not installed” needs its dictionary pack downloaded separately. See also Chrome Spell Check Not Working for a related case.
Does spell check work differently in Word 365 vs older versions?
The core behaviour is the same, but Word 365 receives frequent updates that occasionally reset proofing settings. Word 365 also shows the Editor panel instead of simple red underlines by default — if you prefer traditional spell check, disable Editor in File → Options → Proofing and re-enable “Check spelling as you type.” You might also run into Remote Desktop Not Connecting Windows 11.